Viser innlegg med etiketten Designteam. Vis alle innlegg

tirsdag 17. november 2020

Kvikklunsj kort med juletema!

 Det er så moro å lage noe annet enn bare vanlige kort. Man finner så mange fine maler på diverese sjokolade kort i scrappeverden med litt enkel søking. Jeg har funnet meg en mal på et kvikklunsjkort!


Her har jeg stanset ut skøytediesen til Papirdesign i hvitt og sølv. Pyntet med kristhorn, perler og klistremerkeord. På toppen har jeg strødd litt Frantage embossingpulver fra Stampendous. 


Innvendig har jeg laget en lomme til kvikklunsjen, samt brukt sløyfen til den nye gavediesen fra Papirdesign som dekorelement. Kvikklunsj kort er en super enkel liten hilsen til en venn eller nabo.

Produkter brukt på kortet, kjøpt hos Bikuben:

Ark
Bazzill - Kraft
Bazzill - White
Bazzill - Pomegranate
Stempler
Dies
Papirdesign - PD18415 - Hallo, Tags
Papirdesign - PD190026 - Gave
Papirdesign - PD2000394 - Skøyter
Annet
Embossingpulver - Frangtage - Shabby White

Jeg er med i disse utfordringene med kortet mitt: 


Ha en fin fin tirsdag! 

fredag 2. oktober 2020

Kjære Konfirmant - Dragekort

På tide å skrive litt norsk i denne bloggen også.. Jeg er så utrolig heldig å få lov til å være medlem av Papirdesign sitt designteam, og det fortjener et norsk spåklig innlegg! :D 

I dag deler jeg mitt første innlegg på bloggen deres, så da deler jeg det her også. Dette burde jo vært et innlegg smekkfullt av alle de deilige nyhetene som Papirdesign har kommet med nå de siste ukene, men mine nyheter stod værfast i Nordnorge i 1,5uke, slik at jeg ikke har fått kommet i gang med å organisere noe enda dessverre. Men jeg har noe annet å by på. 

Jeg har aldri laget så mange konfirmasjonskort som jeg har laget i år, så jeg har lyst til å dele et av konfirmasjonskortene jeg har laget. Det finnes ingen som har så masse flott til konfirmasjon som Papirdesign, så her er det bare å plukke godsaker fra øverste hylle. 


Jeg har laget et dragekort! De er så morsomme å lage, i tillegg til dekorative og spennende å gi bort. 

Masse lag på lag med mitt favoritt produkt - Tekstklistremerkene! Jeg elsker dem! 

Inni selve kortet, med pengelomme :) 

Produkter brukt på kortet: 

Papir
PD 1900324 - Håpefull - Ven & Vakker
Dies
Blomster
Hortensia - Rosa
Pynt
Tekstklistremerker

Ha en fortreffelig helg! 
Scrappeklem fra Yasmin

torsdag 16. mars 2017

Mixed Media Tags - DT Scrapki-Wyzwaniowo

It's second reveal time over at the Scrapki-Wyzwaniowo blog and this month is all about numerals. There's soo much to do with numbers, but this time I wanted to make some tags. Been along time since I've made those.

I really enjoyed myself making these, using all sorts of mediums and I brought out some of my old favorites like Art Anthology Colorations Mist. :) 

I tried out the moulds from Prima. I usually make some pieces that I have laying around just incase I need one. The butterflies are resist canvas, also from Prima along with the lace flower that I cut in half. If you'd like to see how I made these tags, please watch the video below. 


I love making these little video tutorials and this was just so fun to make. 

The papers I've used is of course from 7dots Studio, and I've used the Yuletide collection. Not only for christmas people. The chipboard stars are from UmWow studio. Title stickers and stencil is also from 7dots Studio. 

If you'd like to join the challenge, please head on over to the Scrapki-wyzwaniowo blog for all the details. 14 more days to join! 

I'm also entering these challenges with my tag:


Thank you so much for stopping by my blog today! I would love to hear what you think! :) Have a fantastic day folks! 

tirsdag 21. februar 2017

Sisters - Layout - DT Wild Orchid Crafts

Hello everyone! Back today with another share, today I'm up on the Wild Orchid Crafts Blog with a layout to share. I had so much fun making this layout. Let me tell you all about it!

These are my sisters, way back when I was young.. hahaha.. Well.. The picture is about 15-16years old I guess and just a fun memory to scrapbook, because that's what it's all about isn't it? So I made this layout at a crop, this was a challenge and you had to finish in one hour. I used about 45minutes to come up with the idea and making it happen.

The challenge was to use purple, you had to borrow something from your neighbour and use some embossing dry or wet. So I did a bit of mixed media on the background like adding modeling paste, mists and some stamping and of course embossing. You don't know how rushed you feel when you are trying to dry mist and wet medium and making a decent layout at the same time. All in one hour.


I used some of the white open roses and some Pretty Flori - Anemone flowers from Wild Orchid and adding a soda can opener just for fun. I also borrowed some of the punchinella from my neighbor Kjersti at the crop and stapled them on.


I added some large magnolias, anemone and roses to my project, of course from Wild Orchid. The flowers are really good quality flowers and perfect for any project.

Thank you so much for stopping by my blog today. Would love to hear what you think. Have a great creative day! :) 

onsdag 8. februar 2017

Mixed Media Pallet - DT Maya Road

Hello! Back today with a new share. This was one of CHA projects for Maya Road this year, mixed media on a pallet.

So Maya Road has come out with this fun little pallets that's awesome for any project. I played around with different things on my pallet, like mini wood slices also a Maya Road product, Art Stones from Prima and loads of texture with old tekstils and ribbons.

My pallet messures 6x6" and I painted it with gesso. I stamped abit with a easy background script stamp and glued loads of the mini wood slices. I used the Art Stones to fill the gaps in my background.

I decorated with resin flowers, roses and leaves all from Maya Road. After gluing everything down I painted with watercolor confections from Prima. As a last touch I used Inka Gold - Old silver on top.


Thank you so much for stopping by my blog today and taking a look at my pallet! :) I'd love to hear what you think about my project. And if you like these pallets and other wood items from Maya Road, they are having a sale now where you get 20% off all wood items using the cupon code: WoodUBeMine at www.Mayaroad.com. Make sure to hop on over to the Maya Road blog for more inspirational projects with Maya Road projects. :) Huugs!


onsdag 28. september 2016

Quirky Card - DT Maya Road

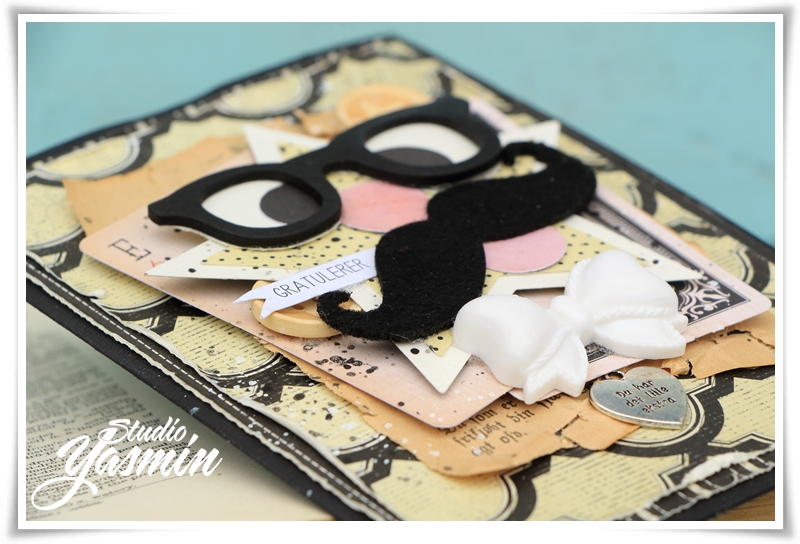
Hello everyone! Back again today to share with you a fun card I made as DT for Maya Road. I made this at the Rensvik Crop witch I'm apart of the administation. So one of the girls - Kjersti - thought of this idea to hand out 2 papers each from this old paper collection from DieCuts with a View, and our fierce leader - Wenche and I we figured we'd share two papers and make something of it. So here are the card I made of that challenge.

So the papers gave me the idea of making a gentleman's card. I used some vintage papers, a couple of playing cards and some Maya Road embellishments and made a quite quirky card.

I made a little face by using a star, adding Maya Road glasses and a moustache from Korthobby.no. I thought all gentlemen needed a bow so I just had to add that. I made the eyes, nose and mouth with a circle punch and added a bit of glossy accent to the nose. I also added a sweet little charm from Korthobby.no.


Oh! I need to tell you about the moustache! It's from Korthobby.no and are made of felt. 

I'm entering these challenges with my card: 


Thank you so much for stopping by my blog today.


onsdag 6. juli 2016

Ballerina Notebook - DT Scrapberry's

Hello my lovlies! It's my day over at the Scrapberry's International blog and I have played with the most gorgeous Scrapberry's Collection "Juliet". I'm made decorated a notebook this time and I must say this I had so much fun decorating.

This collection is filled to the brim with pretty ballerinas and gorgoeus paper. I bought a couple of notebooks at IKEA and I just had to decorate them. I like the mystical, fantasy flowting swans and the ballerina in the photo.

So I used some modeling paste with one of my favorite Prima stencils and added the sequins to the background. I fuzzy cut from papers from the collection and added swans, flowers and the cut out photo. I embellished with flowers from both Scrapberry's and Prima adding lace and sting. Everything got splashed with some white gesso and the flowers got dry brushed too.

The backside I decorated quite easily with just patterend paper, the same stencil and modeling paste, some lace, splashes and a large stickers from Prima.

I love that large resin piece from Scrapberry's. It's so gorgeous and a perfect for my notebook.

I'm joing in these challenges with my notebook: 


Thank you so much for visiting my blog and I'd love to hear what you think :) 

fredag 6. mai 2016

Explosion Box - DT Scrapberry's

Hello my lovelies! Back again today with my first project this month for Scrapberry's designteam. I've made a Explosion box for my nieses confirmation and I've played with the gorgeous blue papers from the "Butterfly Collection".

I've used a chipboard cake from Crafty Moly for my center piece and decorated it with butterflies fuzzycut out of the papers in the collection. The Rhinestones and the blue flowers are also Scrapberry's embellishements. The little golden dots around the egde of the cake is "Dimentional Crystals" by Art Anthology.


Here's the box when put together with the lid on top. I've decorated with a large bow, flowers from scrapberry's and Prima and beautiful resin butterflies from Scrapberry's.

The sides hold pockets to put money and the fourth "flap" has place to write to the recipient.
A little detail on my box. This is one of the pockets to put some money.

I'm joining in these challenges with my explosion box:
Thank you so much for stopping by my blog today! Would love to hear what you think :) 


fredag 8. april 2016

Large Paintable Layout - DT Flying Unicorns

Oh my dear neglected blog... I've had such a busy couple of weeks. I have loads of projects to show you but no time to blog them. But today I'm up on the Flying Unicorn blog to and will share with you a Watercolor paintable layout made with the April kit.

I've used the supplies that came in the kit and addes some extra flowers. You can never get enough flowers or what? :)

This measures about 11"x14" (28cm x 36cm) and is a piece I got to frame and put on my wall at home. This are some the most special people in my life. My 3 babies and my gorgeous dog, Penny. I was orignally planning to put a family photo on this. BUT I didn't have any photo's that worked with all of us together. So have to snap some of those this summer. 

Here's the video tutorial for this large layout: 

I added title strips from 7dots Studio and loads of leftover alphas from American Crafts. Painted with watercolors and splash loads with Dylusions white linen. 

Thank you so much for stopping by my blog today and be sure to stop by the Flying Unicorn for more tutorials and awesome designs with the April Kit. 


søndag 27. mars 2016

Gentleman's Card - DT Crafty Moly

Hello! 3rd Day Streak on my blog this week, back with a card made for Crafty Moly. Last month I made a card for a 70 year old for my husbands grandmother. And it turned out that it was for a man, not for a woman. So I made another one for her.

This card features loads of Crafty Moly Chipboards and papers from Echo Park. I even added a little soda can top in the corner. Do you see it?

I've fuzzycut some elements out from the papers. The mustache is from Korthobby.no and I've splashed with some Tattered Angels - Glimmer glam. I also added a Maya Road linen page from an album I had laying around.

I'm joining in these challenges with my card: 

Thank you so much for stopping by me today! :) 

lørdag 26. mars 2016

Kissing Couple Card - DT Flying Unicorns

Hello lovelies! Back today like I promised with yet another video tutorial and a new project! Today I made a tutorial on who to fold a card and embellish it.


This card is perfect for any occation like weddings, valentines, to that special friend, and I do love the folding on this, I've taught loads of classes doing this techinque and I'm pretty sure it has a fancy flashy name, but I don't really know it.

I've made the card with the same collection as yesterday the Maja Design "Summer Crush" collection. I've embellished loads with flowers and say it in crystals, all from Prima Marketing.

Here's the video tutorial: 


There you have it. I think this type of folding is just so decorative and you can make it in the size you like as long as the paper is square. 

The insert, you can pretty much put almost whatever you like inside as  long as it's flat and not to thick. 

Gorgeous prima flowers and pearls. The dots on the papers are made with Art Anthology Dimensional Crystals - Blizzard. 

I will be joining some challenge with my card: 
Thank you so much for stopping by today, and have a great easter and a marvellous crafty day! 

fredag 25. mars 2016

Happy Layout - DT Flying Unicorn & Maya Road.

Hi all! Today I'm up on the Flying Unicorn blog with two projects today, but I'll be splitting that post into two seperate blogposts to prevent the post being so long, so today I'll be sharing a layout made with Maja Designs "Summer Crush" Collection featuring loads of Prima and Maya Road products. I also made a video tutorial to go with it. :)

This page had such happy colors so if found the title quite fitting for this page. 

I've used gesso in the background, but it doesn't show as well as I wanted I'm afraid. Splashed with colorbloom sprays and white dyluisons white linen mist. 

If you would like to see this layout step-by-step. Please take a look at my video tutorial:


The title is a chipboard piece from 13@rts. The little hanger and paper clip piece is from Maya Road. Love those. The little felt flowers are also Maya Road. The Pearls are from Prima. 

The dimensional crystals from Art Anthology gives a lot of interest to the page. 

Thank you so much for stopping by my blog today and make sure to visit tomorrow for a new project and video tutorial. 


onsdag 16. mars 2016

Spring Card - DT Flying Unicorn

I don't think I'm alone wanting some spring soon.. It's still loaded with snow outside my front door and the kids get wet just looking at the soaked snow. Today I want to share a spring card I made with the Flying Unicorn March Kit of the Month.


I decorated with loads of flowers that came in the kit among leaves I die-cutted out from the paper with a magnolia dies.


 Like I said loads of flowers and I stamped a bit on the egde of the card and splashed with some white dylusions paint. The papers are from Studio 75.

I'm joining in these challenges with my card:

Thank you so much for stopping by my blog today :) 

fredag 4. mars 2016

Moments - Layout with Video Tutorial - DT Flying Unicorn

Hello Everyone, I'm up on the flying unicorn blog today with a layout and a video tutorial showing you how I made it, playing with the march kit of the month.


This kit time the kit is a bit different since it's just one kit including all the stuff you like. It's a bit of everything from the past 4 kits put into one. Let's take a look at the kit:


It's a gorgeous kit right? So much goodies.. here's the layout I made using these products: 

The layout is of me and my youngest son at the hospital when he was just a few weeks old. He was born too early so we had to stay in the hospital for a month after he was born. I've used papers from Studio75, and paints from Prima and 13@rts. 


Here's the video tutorial of the layout:


I've used papers from Studio75, Flowers from Prima and the hearts are made with Prima's adhesive rub-ons and gold foil on top. I also added some chipboards from Crafty Moly to my background. 


I've used different background techniques and stencil from 13arts. Chipboard word - "Moments" is also from 13arts.

Thank you so much for stopping by today! Make sure to visit the Flying Unicorn forums for more inspiration and great shopping :)